


Alarm Configurations
The SignalFire Cloud provides a robust and flexible system that allows users to be notified by email and/or text message when a specified metric from a RANGER enters and clears an alarm state. The alarms can be set up so only certain users get alarms for certain RANGERS with the alarm group function.
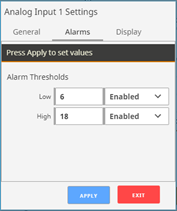
To enable an alarm on an account with the Alarm Admin role, go to the RANGER, click “Configure” on the tile for the metric that you’d like to trigger an alarm on, and set its alarm threshold through the Alarms tab. The screenshot below shows the Configure window for Analog Input 1. If Analog Input 1 goes below 6mA or above 18mA, an alarm notification will go out to every user subscribed to this RANGER’s alarms. A user with Alarm Ack permissions may acknowledge the alarm to signal that the alarm and/or its cause have been taken care of. Unacknowledged alarms can be seen accumulated in the upper right-hand corner of the Cloud page.
Alarm Views
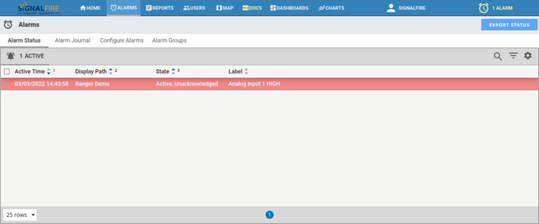
Clicking on the Alarms button in the top bar will open a table of all alarm trigger events. The list of events can be sorted in ascending or descending order by any of the display columns by clicking on the column name.
The Alarm Status view contains the current state of the alarm system, while the Alarm Journal contains a history of all alarm events. Both the status and journal alarm tables can be exported to a csv file.
The upper-right hand corner of the table contains a gear icon, sort icon, and search icon that help filter and find alarm triggers. The gear icon is used to enable/disable the display columns used for ascending/descending sort. The sort icon is used to filter alarms by their cleared/acknowledge state. The search icon is used to search alarms by keyword in any of its enabled columns. For example, if there is a RANGER named “Tank 6R” and the name column is enabled, typing in “Tank 6R” will show all alarm events from that RANGER. Hovering the mouse over a line will show a icon. Clicking on it will reveal a detailed view for that alarm.
State
RANGER alarms, once triggered, can be in one of four states: “Active, Unacknowledged”, “Active, Acknowledged”, “Cleared, Unacknowledged”, and “Cleared, Acknowledged”. Active means that the alarm still meets the alarm trigger criteria, while Cleared means it no longer does. Unacknowledged means that the alarm has not been dismissed by someone with Alarm Ack privileges, while Acknowledged means a user had seen and acknowledged the alarm.
For example, a digital input set to flow mode may have an alarm set to trigger when the average flow rate goes above 15 gallons/sec. When that threshold is first crossed, the alarm will appear in the Alarms table as “Active, Unacknowledged”. If the average flow rate goes down to 12 gallons/sec, the state will change to “Cleared, Unacknowledged”. Once an Alarm Ack user acknowledges the alarm, the state will change to “Cleared, Acknowledged”. In other words, the inputs control the Active/Clear state, while users control the Unacknowledged/Acknowledged state.
To Acknowledge an alarm, a user with the Alarm Ack user role must click on the alarm and click “Acknowledge” in the bottom right corner. A user may alternatively select “Shelve”, which prevents the alarm from triggering for a time period.
Configure Alarms
Users may also edit alarm settings by clicking on “Configure Alarms” in the tab list of the Alarms page. This view shows all possible alarm sources on all possible devices in the user group. The interface on the right side can be used to filter which devices, input types, and alarm groups show up in the table. This interface provides a convenient way of modifying alarms across multiple RANGERS and multiple types of alarms.
For example, clicking on Select Devices will pull up a list of all devices available. Select the RANGERS to filter by and click “Select” to add it to the list. Hold the Ctrl key as you click to select multiple at a time, or the Shift key to select a range. Once you have all the devices you’d like to see on the Included Devices list, click View Selected. Click “Clear Filter” to view all devices again.
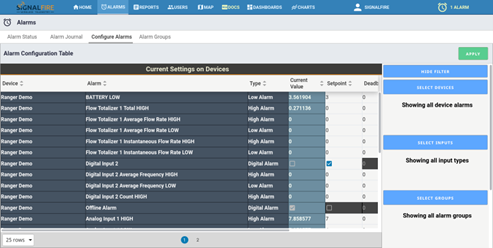
To change a field, double click the field, enter the desired value, and then press the Enter key. Fields that have been edited but not set will be highlighted yellow. Clicking cancel will undo the yellow highlighted fields. Once all fields have been edited as needed, click the green Apply button in the upper-right hand corner. The yellow highlighted fields will change to green to indicate the changes have been set.
For a digital input, if the setpoint column is checked off that means the alarm will trigger when that input is Close or logic 1. For analog alarms, it sets the high or low threshold value depending on if it’s a High Alarm type or Low Alarm type.
The Deadband column changes the Clear threshold for an analog alarm. As an example, if the high alarm level is 4,000, and the deadband is 200, after the analog input has gone above 4,000 and activated the alarm, it will have to go below 3,800 for the alarm to clear. Similarly, if the low alarm is 2,000 and the deadband is 200, the input will have to go above 2,200 to clear an active low alarm. This setting is useful to prevent multiple alarms when a reading is at the alarm threshold.
The Delay column adds a countdown timer to the alarm that starts once the threshold has been crossed. If the input stays past the threshold for entire duration of the Delay countdown, the alarm becomes active and alert messages are sent out. However, if the RANGER reports a reading below the threshold during that countdown, the timer is reset, and the threshold must be crossed again for the countdown to start again. The Delay value should be greater than the RANGER’s report interval so there’s at least one new reading before the countdown ends.
The Delay timer takes the Deadband value into consideration. Consider the previous example where the high alarm threshold is 4,000 and the deadband is 200, but now there is a 120 second Delay. Once the RANGER reports a reading above 4,000, a 120 second countdown begins. If the RANGER reports a reading of 3,900 before the timers hits 0, the alarm still activates because it’s within the deadband. If it instead goes to 3,700, the timer is reset and the input has to go back above 4,000 for the Delay timer to count down again.
Alarm Groups
When alarms are triggered, the Cloud sends messages out to users based on alarm groups. Click on the “Configure Groups” button in the upper-right corner of the Alarms tab to edit user and RANGER alarm groups. Only users with Alarm Admin privileges may edit settings here.
New users and newly added RANGERS will be assigned to the Default Alarm Group, which cannot be removed or renamed. To add a new group, click on the “+ New” button in the Groups tab, and then rename it in the Name field. To select which RANGERS you’d like to have in the group, click on the Configure button, check off the desired RANGERS, and click Apply.
To add a single RANGER to multiple groups at once, go to the RANGERS tab, click on the RANGER, check off the groups to add it to in the panel on the right, and click Apply. When any of that RANGER’s alarms become active or clear, the Cloud will send messages to every user in the groups the RANGER is a part of.
To edit each user’s group, click the Configure button to bring up a list of all users. You may then one-by-one edit which single group a user is assigned to. Users may only be assigned to a single group.